Author: nicholascampa2018

  • Shorter Cadence, Smarter Testing: How to Manage Microsoft 365 Updates

    Microsoft has reshaped their update cadence for Microsoft 365 applications, and product owners need to adjust their testing and release strategies accordingly.

    • Shorter support windows: The Semi-Annual Enterprise Channel now has only eight months of support (down from fourteen), giving IT teams less time to validate and stabilize builds.
    • More frequent updates: Most interactive,end-user systems are expected to move to the Monthly Enterprise or Current Channels.
    • Longer rollback: The Monthly Enterprise Channel now provides a two-month rollback option (up from one), creating a small buffer to mitigate risk.

    The long runway that enterprises once relied on for regression testing and validation is narrowing. To keep pace without compromising stability, end-user computing and Microsoft 365 product owners should embrace automation and modern release validation practices.

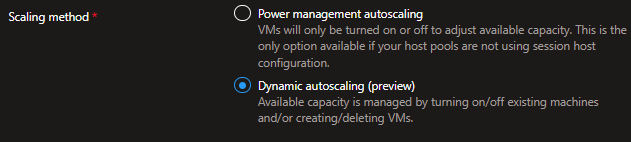
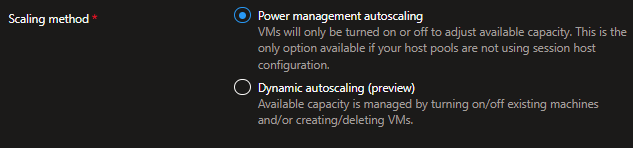
    The Solution: Automate, Validate, and Stay Confident

    Login Enterprise can help IT teams build confidence and preserve end-user experience, through:

    • Automated regression testing: Application testing can simulate end-user workflows across Microsoft 365 applications, including macros or complex VBScript in Excel.
    • Continuous validation: Supports integration with CI/CD pipelines via API, enabling frequent, repeatable tests.
    • Actionable insights: Detailed reporting and customized alerting helps IT identify broken workflows and prioritize fixes`

    Login Enterprise allows end-user computing teams to proactively validate Microsoft 365 updates, reduce downtime, and maintain confidence, even as updates accelerate.

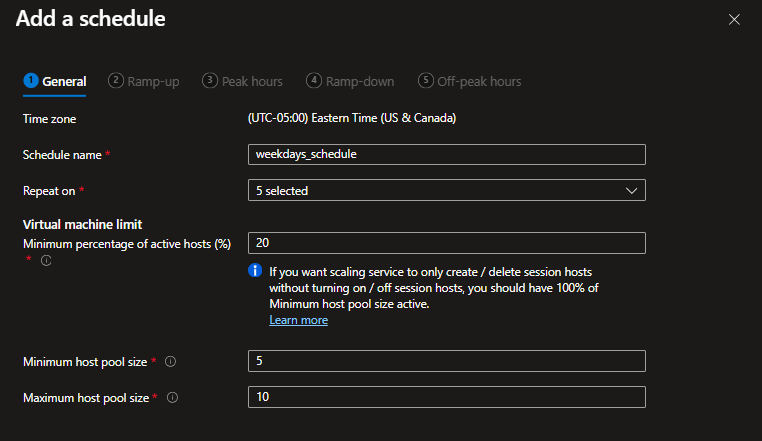
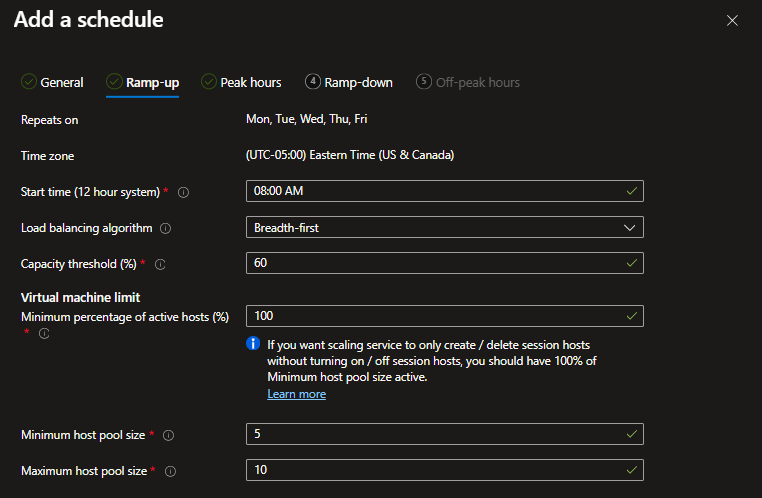
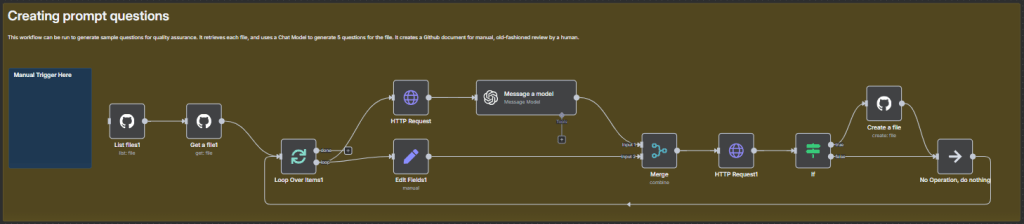
    Examples: Excel Testing at Scale

    The screenshot below shows Microsoft Excel and an example spreadsheet with custom VBScript exposed through buttons. This simplified setup mirrors how many enterprise teams manage quality control for critical Excel customizations today.

    In a traditional quality assurance cycle, testers manually step through each Excel use case, documenting results and timing by hand.

    With Login Enterprise, the same process is automated, repeatable, and scalable. The example Application Test report below shows not only that each test case was executed successfully but also captures the runtime of every step. These results can be easily shared with a Change Advisory Board (CAB) or business stakeholders, translating technical findings into clear insights on risk and stability.

    The Takeaway: Agility Requires Automation

    While this new release cycle requires new management processes, there is an opportunity to rethink how enterprises approach change management altogether. Here are some things to consider:

    • Testing timelines are shrinking: An accelerated Microsoft 365 cadence means IT can no longer rely on longer validation windows.
    • Agility requires automation: Continuous integration and validation should be treated as core components of end-user computing strategy.
    • Reporting must bridge the tech gap:Clear data-driven reporting is meaningful to both IT and stakeholders to help inform risk decisions at the CAB.

    If you have any questions or enjoyed the blog, feel free to reach out or drop a like!

  • Dynamic autoscaling in AVD

    In previous posts, we covered Azure’s primary autoscaling capability, Power management autoscaling. It uses a matrix of rules defined across four periods of the day (Ramp-up, peak, ramp-down, off-peak hours) to power-on and power-off session host VMs.

    In this article, we’ll cover Azure’s Preview capability, Dynamic autoscaling – how it’s different than Power management autoscaling, additional benefits, and its limitations. First, we’ll walkthrough the configuration wizard and discuss available settings.

    Configuring dynamic autoscaling

    While in Preview mode, Dynamic autoscaling goes further than Power management autoscaling by creating and deleting session hosts.

    Already the settings in the Add a schedule wizard differ than those for Power management autoscaling:

    • Minimum host pool size is base capacity floor (the min. number of hosts in the pool, whether running or stopped)
    • Maximum host pool size is the capacity ceiling; the max. number of session hosts that Autoscale can create
    • Minimum percentage of active hosts is the minimum percentage of session hosts that should be always available. If this value is set to 10% and the Minimum host pool size is 10, Autoscale will ensure 1 session host is available.

    Note the tooltip’s suggestion that a 100% setting for the Minimum percentage of active hosts will force autoscale to only create and delete hosts as opposed to starting and stopping them.

    The Add a schedule wizard has the same flow as the Power management autoscaling, including the same usage periods:

    • Ramp-up
    • Peak hours
    • Ramp-down
    • Off-peak hours

    The Ramp-down schedule has added some options for forced logoffs. These settings work the same as when configured for Power Management autoscaling – except for the fact that Autoscaling can now delete unused session hosts as opposed to just deallocating them.

    During off-peak hours using an aggressive capacity threshold and minimum active host percentage can provide cost savings by only spinning up session hosts ad hoc.

    What next?

    We’ve now covered the generally available Power management autoscaling and Azure’s Preview capabilities around Dynamic autoscaling. In future articles, we’ll directly compare the two solutions. See you there.

  • Power management autoscaling in AVD

    What is autoscaling?

    By default, Azure Virtual Desktop (AVD) session hosts are statically deployed. While session hosts are powered on, they are incurring compute and storage costs, for ‘renting’ the VM, and housing the OS storage disk. If you deallocate VMs, you save on the compute cost, but the storage costs persist. (FWIW this is the third-party website (cloudprice.net) I use for quickly viewing and comparing costs between SKUs and regions.)

    Ideally, autoscaling provides demand elasticity. Based on the user demand, autoscaling can expand and contract available capacity, optimizing the usage costs described above.

    Once created and defined, a scaling plan can be applied to multiple host pools, but a host pool can only utilize one scaling plan. Scaling plans can have multiple schedules to support changing requirements, such as weekdays versus weekends.

    Important to note is that autoscale ignores drain mode settings, and for pooled scenarios, it ignores load balancing algorithms (in favor of those defined in the scheduled autoscaling plan).

    At present, Azure’s generally available autoscaling is Power management autoscaling:

    • Adjusts available capacity in a pool by powering on and shutting off session hosts based on demand

    Configuring scaling plans

    For the scaling method, this post will cover Power management. In future posts, check out content on Dynamic autoscaling.

    Configuring scaling plans

    After inputting some metadata like the name, resource group, and region, admin can select their scaling type:

    Scheduling options differ between pooled and personal scenarios. This section will discuss the nuances to be aware of. First, we’ll cover the four conceptual parts of the day:

    • Ramp-up, which is the start of the day
    • Peak hours are when the usage is highest
    • Ramp-down hours occur as users logoff (typically where scaledown occurs)
    • Off-peak hours are hours when the usage is lowest

    Pooled schedules

    Below the Azure Portal Add a schedule wizard is shown. Admin specify when their ramp-up period begins, the desired load-balancing algorithm. Importantly, they specify the Minimum percentage of hosts (%) and Capacity threshold:

    • Start time is when the ramp-up logic should start
    • Minimum percentage of hosts is the percentage of session host VMs to start for ramp-up and peak hours. If you have 10 hosts in a pool and this is set to 10%, 1 VM will be powered on.
    • Capacity threshold is the percentage of capacity used before autoscaling will evaluate rulesets. If this is set to 60% and the total host pool capacity is 100 sessions, additional session hosts will be powered on once exceeding 60 sessions.
    • Load balancing algorithm is set to Breadth-first. As the machines are powered-on, end-users will be brokered to the ‘least busy’ host.

    The peak hours period uses the same settings, except for Minimum percentage of hosts. During the peak usage periods you want capacity to handle incoming demand. So, all needed VMs are powered on.

    • Notice here that the load balancing algorithm is now depth first, to effectively utilize all powered on resources.

    And below us now are the default Ramp-down settings.

    • Minimum percentage of active hosts is the number of machines you’d want to leave powered on during off-peak hours. If you have 10 session hosts and this value is set to 10%, autoscale will power off 9 hosts, leaving 1 available.
    • Capacity threshold means the same here. But, the noticeably higher value here means that a host pool with a total capacity for 100 sessions would only power on additional hosts when exceeding 90 sessions. During the ramp-down, this allows for powering down hosts.

    Unlike the others, the ramp-down contains the force sign out and delay time before force logout settings.

    Lastly, here are the Off-peak hours settings. Only the capacity threshold is available.

    Personal schedules

    During ramp-up periods for personal pools, the following options are available.

    • Whether to use Start VM on Connect, which allows for keeping host VMs powered off until they are needed
    • VMs to start controls which machines would be powered on automatically at the ramp-up start time. For example, all assigned hosts can be started. Or, the Don’t turn VMs on at start time setting can be used with Start VM on Connect for maximum cost savings. This may hinder the user-experience as end-users have delayed logins.

    Unlike pooled scenarios where multiple users are on a host VM, personal pools allow for more aggressive management. The Disconnect settings and Sign Out settings are unique to personal pools:

    • When disconnected for N minutes, admin can configure whether to take no action, Hibernate the VM, or Shutdown the VM.
    • When logged off for N minutes, admin have the same options.

    Peak hours, ramp-down, and off-peak hours all share the same Wizard options as shown here.

    Because of the consistent settings, admin really are leveraging the Disconnect and Sign out settings to optimize costs. Depending on the time of day, admin may take a more (less) aggressive approach. As always there is a balance with end-user experience. Hibernating and/or shutting down host VMs will result in delayed logins when the user attempts reconnection which must be taken into account.

    Coming soon…

    As a follow up to this article, we’ll cover Azure’s Preview capability, Dynamic autoscaling. See you there.

  • Session host management options in native AVD

    This blog will detail the best practices for managing an Azure Virtual Desktop implementation without a third-party control plane, such as Hydra.

    Host pool management

    Session host configuration is essentially a blueprint that configures session hosts as they are created, including:

    • Session host configuration: blueprint for session host VMs
    • Session host management policy: blueprint for lifecycle management including creation and updating host VMs
    • Session host update: updates host VMs when the session host configuration is updated to ensure consistent behavior across the pool
    • Autoscale: dynamically scales the number of host VMs in a host pool based on demand

    Session host configuration

    It includes properties like:

    • VM name prefix, VM resource group, Avail. Zones
    • VM image, VM size, OS Disk information
    • VM location, VM tags, VM network settings

    These settings and more are configured once and applied to those hosts created in the future. Changing the settings above will change the configuration of hosts that are deployed via Autoscaling.

    If you modify the configuration while there are existing hosts in a pool, you must schedule the update action. If there’s none present, you’re good to go.

    Session host management policy

    A Session Host Management policy sets the update and creation behavior of the pool. When using Session Host configuration, at least one host management policy is required. A management policy is created once you enable Session Host Configuration, with the defaults shown here:

    settingdescriptiondefault
    time zonethe time zone used to schedule updatesUTC
    max VMs removed during updatesthe max number of session hosts to update concurrently (batch size)1 VM
    logoff delay (minutes)the amount of time to wait after an update for users to be notified to sign out, before forcing logoffs2 minutes
    logoff messagethe messaged displayed to users during update process“You will be signed out”
    leave in drain modewhether newly created hosts should be left in drain-mode for post-deploy actionsFalse
    failed session host cleanup policywhether to keep none, some, or all hosts that raise errors during deployment. Not applicable for updates (only creates)KeepAll

    A couple of thoughts here:

    • Max VMs removed during update: In larger host pools, this might be too slow. Batches of 3-5 hosts may be more appropriate. Balancing speed vs. user impact is the trade-off, but for certain zero-day updates or urgent resolutions there may be little flexibility.
    • Logoff delay in minutes: For critical workloads, the default two-minute logoff delay might be too low. Again, depending on the urgency there may be little flexibility.
    • Leave in drain mode: if images don’t require any post-deployment prep via Intune or SCCM, leave this false to allow rapid session host availability.

    Standard management

    Standard management is best suited alongside automated pipelines, custom deployment scripts, and management platforms like Hydra.

    Microsoft calls out common admin tasks and processes in comparison with the Session Host Configuration approach.

    • Creating and configuring session hosts can be done in the portal or other automation using a registration token. Admin must ensure the configuration is consistent across the pool, so automation is key even in native-Azure deployments.
    • Scale session hosts can be configured using Azure Autoscale (e.g., Scaling Plans) to turn session hosts on and off based on schedules and usage demands
    • Update session host images using automation pipelines or custom scripts as the Host Update capability is unavailable.
    • Automatically powering on session hosts can still be achieved using the Power-on-Connect (Start VM on Connect) feature to enable end-users to turn on their session hosts as needed.

    Working with Azure admin, many use the Azure Image Builder (or native Packer) in concert with Azure Compute Gallery, such that the latest image is always used in a host pool, and new hosts always inherit the latest and greatest changes as they are built.

    Takeaways

    In future articles, we’ll dig deeper into native autoscaling and the Session Host update (preview) capabilities within Azure. Because Hydra has powerful built-in image management capabilities, digging into AIB or Packer CI/CD pipelines won’t be a top focus.

    Whatever we cover, we hope to see you there.

  • Proof of concept for generating synthetic content for RAG agent

    I wrote a brief article about my experimentation with N8N, an automation platform with many native AI integrations. You can read that here. In that post I described a few proof of concepts I built integrating Login Enterprise.

    Taking that knowledge a little farther, I wanted to experiment with a Retrieval-Augmented Generation (RAG) system. To do so, I first wrote a script to scrape the HTML contents of the Login VSI Knowledge Base. This amounted to 38 articles and only 550kb of data, not nearly enough for robust knowledge.

    With limited data the vector space becomes sparse. This causes the model to return similar answers for different but nuanced questions, simply because the embedding space doesn’t have enough coverage to distinguish them.

    Building a more robust corpus and database ensures there is diverse content for the model to leverage when responding to prompts improving accuracy and subtle nuances.

    This blog covers some of my work in this area, including learnings. The main takeaway is the importance of a robust vector space for similarity searches. Generating synthetic content is useful to plug the gaps, but what happens when the models we rely on for education, in politics or the public square is trained on vast amounts of made up information?

    Vector embedding the knowledge base

    In this proof of concept, I used a Python script to extract documentation content from the knowledge base. Limits on volume of data meant that Github was perfectly suitable for this storage, and wanting to limit dependencies underscored that idea.

    Pinecone was used as a Vector store, unlike my previous post which only used built-in N8N memory capabilities.

    Generating synthetic question-answer pairings

    A commonly used technique in scenarios where there is limited data is, apparently, to generate synthetic question-answer pairings. Quite simply, you can feed each article into an LLM prompting for 5 questions in a tidy format based on the article at hand.

    This pipeline:

    1. Lists all files in the Github repo
    2. Gets metadata, such as raw download link
    3. Downloads its contents
    4. Sends it to the LLM, prompting for N questions
    5. Performs error-handling, verifying that repo/questions/<article> doesn’t already exist. If not, it creates it.

    Next, you can feed the article and its comprehension quiz into the LLM, prompting it to analyze the article and answer each of the questions, providing answers in an equally-tidy format as the ones it received.

    Next, the answers generation. In a similar order of operations, we get each file in the repo, then its contents. An AI Agent deemed the “Product Expert” agent was used in this example. It had these tools available:

    • OpenAI Chat Model
    • Vector Store Tool
      • PineCone Vector Store (Retrieval node)
        • OpenAI Embeddings Node
      • Open AI Chat Model

    After some similar error-handling I had already implemented above (so why not use here too!) it created 38 files in my /answers folder.

    Sample q/a pair

    Below a sample q/a pair is included. You’ll have to believe me that this is an accurate response to this question. Glass half empty, users of such a product would immediately spam it with the most difficult questions. So, this likely isn’t enough.

    {
    "article": "application-testing-results",
    "question": "What information is displayed in the Platform Summary section of a single Application Test result?",
    "answer": "The Platform Summary section of a single Application Test result displays the following information:\n - Logon performance:\n - Actual: The actual time it took to log in.\n - Threshold: The login time threshold set in the Test.\n - Execution: Green if the login was successful, regardless of the time taken.\n - Performance: Green if the actual login time was below the threshold or if no threshold was set; red if the actual time exceeded the threshold."
    }

    What next

    As the next steps here, I will start experimenting with Azure OpenAI Labs. Much of this functionality can be implemented there as well.

  • Better Together: Login Enterprise & Hydra (Part 2)

    Created by AI.

    This is part two of a series walking through how Hydra can integrate with Login Enterprise for further automated testing capabilities. If you haven’t read that article, check this out:

    Better Together: Login Enterprise & Hydra (Part 1)

    That blog talks about how Hydra can orchestrate fully-automated Launcher deployments, leveraging an Azure Marketplace vanilla image customized by Hydra Script Collections.

    The workflow

    This time we’ll focus on the Session Host, or in LE terms– the testing Target. In Login Enterprise, there is one primary dependency here, the Logon Executable, whose primary responsibility is to trigger automation scripts once a Virtual User logs in. The process looks like:

    1. Virtual User logs into Windows Desktop
    2. Logon Executable is triggered by Startup (e.g., GPO, Registry, Startup folder placement)
    3. Logon Executable “calls home” to download dependencies and initiate its job

    Configuring the Logon Executable

    This script is very similar to the Launcher Installation and Startup Shortcut configuration covered in Part 1, except this can be directly downloaded from a Login Enterprise Virtual Appliance.

    The PowerShell script automates the configuration by a) downloading the standalone Logon Executable from the specified appliance and b) creating a shortcut in the Startup folder.

    Anyway, here is the code:

    LogWriter("Downloading Logon EXE")
    
    # Base FQDN of the appliance
    $applianceFQDN = "https://<your_login_enterprise_fqdn_here>"
    
    # URL of the ZIP file to download
    $url = "$applianceFQDN/contentDelivery/api/logonApp"
    
    # Arguments to pass to the EXE (adjust as needed)
    $arguments = $applianceFQDN
    
    # Define temp paths
    $tempDir    = "C:\LoginVSI"
    $zipName    = [IO.Path]::GetFileName($url)                    
    $zipPath    = Join-Path $tempDir "$zipName.zip"                      
    $extractDir = Join-Path $tempDir ([IO.Path]::GetFileNameWithoutExtension($zipName))
    
    # Define shortcut properties
    
    # Define target executable and Startup shortcut paths
    $targetPath = "C:\LoginVSI\logonApp\LoginPI.Logon.exe"
    $shortcutPath = "$env:ALLUSERSPROFILE\Microsoft\Windows\Start Menu\Programs\Startup\LoginPI_Logon.lnk"
    
    # Ensure the extract directory exists (or recreate it)
    if (Test-Path $extractDir) {
        Remove-Item -LiteralPath $extractDir -Recurse -Force
    }
    New-Item -ItemType Directory -Path $extractDir | Out-Null
    
    try {
        # Download the ZIP file
        Invoke-WebRequest -Uri $url -OutFile $zipPath -UseBasicParsing
    
        # Extract the ZIP into $extractDir; -Force will overwrite if files already exist
        Expand-Archive -Path $zipPath -DestinationPath $extractDir -Force
    
        # Find the first .exe in the extracted folder (recursively)
        $exe = Get-ChildItem -Path $extractDir -Filter '*.exe' -Recurse |
               Sort-Object LastWriteTime -Descending |
               Select-Object -First 1
    
        if (-not $exe) {
            throw "No executable (.exe) found in '$extractDir'."
        }
    
        # Create the shortcut
    
    try {
        
        # Verify the target executable exists
        if (-not (Test-Path -Path $targetPath -PathType Leaf)) {
            throw "Target executable not found: $targetPath"
        }
    
        # Ensure the Startup folder exists (it should, but just in case)
        $startupFolder = Split-Path -Parent $shortcutPath
        if (-not (Test-Path -Path $startupFolder -PathType Container)) {
            throw "Startup folder does not exist: $startupFolder"
        }
    
        # Create the WScript.Shell COM object
        try {
            $WshShell = New-Object -ComObject WScript.Shell
        }
        catch {
            throw "Unable to create WScript.Shell COM object: $_"
        }
    
        # Create the shortcut
        $shortcut = $WshShell.CreateShortcut($shortcutPath)
    
        # Assign properties to the shortcut
        $shortcut.TargetPath       = $targetPath
        $shortcut.Arguments        = $arguments
        $shortcut.WorkingDirectory = Split-Path -Parent $targetPath
    
        # Save the shortcut to disk
        $shortcut.Save()
    
        Write-Host "Shortcut successfully created at: $shortcutPath"
        LogWriter("Shortcut created!")
    }
    catch {
        Write-Error "Failed to create shortcut: $_"
       LogWriter("Failed to create shortcut! $_")
    }
    
    
    }
    catch {
        Write-Error "An error occurred: $_"
        LogWriter("An error occurred! $_")
    }


    What’s next?

    This was the first series that covered how Hydra and Login Enterprise can operate better together. Perhaps there will be similar installments down the line, so look out for those.

  • Better together: Login Enterprise & Hydra (Part 1)

    Created by AI.

    If you haven’t seen the news, Login VSI acquired a new technology: Hydra. Hydra is a powerful Azure Virtual Desktop management and orchestration platform. Its main use cases include image management, auto-scaling, and user session management– in addition to providing a sleeker UI than native Azure.

    Hydra has the ability to execute PowerShell scripts against Session Hosts in host pools its managing. This means that custom images aren’t required, and Azure Marketplace images can be used with layered PowerShell customizations. This blog is Part One of a two part series that will highlight how this approach can be used to automate the deployment of Launchers and Session Hosts, all ready to test with Login Enterprise.

    The workflow

    To test Azure Virtual Desktop, there are two common approaches:

    • Using the Remote Desktop Client
    • Using the Windows App

    Login VSI has created templates for both scenarios, but the RDC is preferred in my case. To test Azure Virtual Desktop with a Login Enterprise Launcher, one needs installed a) the Launcher b) the Universal Web Connector and c) the appropriate ‘Connection Scripts’ to automate the connection process via UI.

    Hydra has a concept of “Collections” which is a group of PowerShell scripts that are executed in sequence, with built-in error-handling, and the ability to interact with the VM (e.g., Install something then restart the VM). So, Collections will be used to configure the Launcher and Session Host.

    Installing the Launcher, UWC, and RDC

    The Launcher, Universal Web Connector, and Remote Desktop Client can all be installed using an analogous approach, so I will describe here only the Launcher installation.

    The PowerShell script automates the installation by downloading an MSI installer from a specified URL (in this case, hosted in Github) and executing it locally.

    The script also creates a Windows Shortcut for the Launcher, which is stored in the “All Users” Startup folder. As you’ll see in the next section, we use a local account configured with SysInternals’ AutoLogon to act as a Launcher service account. When the Autologon user logs in, the Launcher will automatically start, ready for testing.

    Here’s the code:

    # Set Login Enterprise Details
    $serverUrl = "https://<your_login_enterprise_fqdn_here>"
    $secret = "<your_launcher_secret_here>" 
    
    # Set Launcher Installation Defaults and Startup Folder Location
    $launcherProgramFilesPath = "C:\Program Files\Login VSI\Login Enterprise Launcher"
    $targetPath = Join-Path $launcherProgramFilesPath "LoginEnterprise.Launcher.UI.exe"
    $shortcutPath = "$env:ALLUSERSPROFILE\Microsoft\Windows\Start Menu\Programs\Startup\LoginEnterpriseLauncherUI.lnk"
    $startupFolder = Split-Path -Parent $shortcutPath
    
    
    ####################################################################################################
    # Download and Install MSI from GitHub
    ####################################################################################################
    $msiUrl        = "https://<URL_for_launcher_executable>" # E.g. add Setup.msi to public Github Repo
    $msiName       = "Setup.msi"
    $downloadDir   = "C:\Launcher\Installer"
    $msiPath       = Join-Path $downloadDir $msiName
    
    OutputWriter("Starting MSI download and install process.")
    OutputWriter("Installer URL: $msiUrl")
    OutputWriter("Installer will be saved to: $msiPath")
    
    ####################################################################################################
    # Create download directory
    ####################################################################################################
    if (-not (Test-Path $downloadDir)) {
        OutputWriter("Creating installer download directory: $downloadDir")
        try {
            New-Item -Path $downloadDir -ItemType Directory -Force | Out-Null
            LogWriter("Created directory $downloadDir")
        } catch {
            OutputWriter("Failed to create directory: $_")
            LogWriter("Directory creation failed: $_")
            exit 1
        }
    } else {
        LogWriter("Download directory already exists: $downloadDir")
    }
    
    ####################################################################################################
    # Download MSI
    ####################################################################################################
    OutputWriter("Downloading installer...")
    try {
        Invoke-WebRequest -Uri $msiUrl -OutFile $msiPath -UseBasicParsing
        OutputWriter("Download completed.")
        LogWriter("Downloaded $msiName to $msiPath")
    } catch {
        OutputWriter("Download failed: $_")
        LogWriter("Download error: $_")
        exit 1
    }
    
    ####################################################################################################
    # Install MSI
    ####################################################################################################
    if (Test-Path $msiPath) {
        OutputWriter("Starting MSI installation...")
        try {
            $arguments = "/i `"$msiPath`" /qn serverurl=$serverUrl secret=$secret"
            LogWriter("Executing: msiexec.exe $arguments")
            $process = Start-Process -FilePath "msiexec.exe" -ArgumentList $arguments -Wait -PassThru
    
            if ($process.ExitCode -eq 0) {
                OutputWriter("MSI installation succeeded.")
                LogWriter("Installer exit code: 0 (Success)")
            } else {
                OutputWriter("MSI installation failed with exit code: $($process.ExitCode)")
                LogWriter("Installer exit code: $($process.ExitCode)")
                exit $process.ExitCode
            }
        } catch {
            OutputWriter("Installation process failed: $_")
            LogWriter("Installer exception: $_")
            exit 1
        }
    } else {
        OutputWriter("MSI file not found at expected path: $msiPath")
        LogWriter("Installer missing: $msiPath")
        exit 1
    }
    OutputWriter("MSI process completed.")
    
    if (Test-Path $launcherProgramFilesPath) {
        OutputWriter("Launcher installation deemed successful based on installation folder in %PROGRAMFILES%.")
        # exit 0
    }
    
    ##################################################
    # Add Launcher to Startup folder
    ##################################################
    OutputWriter("Starting shortcut creation and Startup placement process.")
    OutputWriter("Creating shortcut from: $targetPath")
    OutputWriter("Shortcut will be added to $startupFolder")
    
    try {
        
        # Verify the target executable exists
        if (-not (Test-Path -Path $targetPath -PathType Leaf)) {
            throw "Target executable not found: $targetPath"
        }
    
        # Ensure the Startup folder exists (it should, but just in case)
        if (-not (Test-Path -Path $startupFolder -PathType Container)) {
            throw "Startup folder does not exist: $startupFolder"
        }
    
        # Create the WScript.Shell COM object
        try {
            $WshShell = New-Object -ComObject WScript.Shell
        }
        catch {
            throw "Unable to create WScript.Shell COM object: $_"
        }
    
        # Create the shortcut
        $shortcut = $WshShell.CreateShortcut($shortcutPath)
    
        # Assign properties to the shortcut
        $shortcut.TargetPath       = $targetPath
        $shortcut.Arguments        = $arguments
        $shortcut.WorkingDirectory = Split-Path -Parent $targetPath
    
        # Save the shortcut to disk
        $shortcut.Save()
    
        OutputWriter("Shortcut successfully created at: $shortcutPath")
        # LogWriter("Shortcut created!")
    }
    catch {
        # Write-Error "Failed to create shortcut: $_"
        OutputWriter("Failed to create shortcut! $_")
    }


    Configuring SysInternals Autologon

    The PowerShell script below automates the setup of Windows AutoLogon for a local user account. It downloads the SysInternals’ AutoLogon utility, then checks there is a local user account with the specified $autoLogonUsername exists. Otherwise, it creates one with a randomly generated password. The $autoLogonCount variable controls the number of automatic logons that are configured–each restart of the VM will decrement this value until its zero and no further auto logons will occur.

    Here’s the code:

    ####################################################################################################
    ####################################################################################################
    # Configure AutoLogon
    ####################################################################################################
    ####################################################################################################
    $autoLogonCount               = "7" # Configure the number of automatic logins here. Currently, this will configure 7 automatic logins.
    $autologonDownloadUrl         = "https://download.sysinternals.com/files/AutoLogon.zip"
    $autologonDownloadDestination = "C:\Launcher\AutoLogon"
    $autologonZipDestination      = Join-Path $autologonDownloadDestination "AutoLogon.zip" # C:\Launcher\AutoLogon\AutoLogon.zip
    $autologonUnzipDestination    = Join-Path $autologonDownloadDestination "AutoLogon"     # C:\Launcher\AutoLogon\AutoLogon\
    $autologonExePath             = Join-Path $autologonUnzipDestination "AutoLogon64.exe"  # C:\Launcher\AutoLogon\AutoLogon\AutoLogon64.exe
    
    $autologonUsername            = "autologin" # This is the username of the local user account, used for AutoLogon. You may configure this value.
    Add-Type -AssemblyName System.Web
    $password = [System.Web.Security.Membership]::GeneratePassword(20, 4) # A randomized password is created
    $securePass = ConvertTo-SecureString $password -AsPlainText -Force
    
    OutputWriter("Downloading SysInternals' AutoLogon from: $autologonDownloadUrl")
    OutputWriter("Archive will be downloaded to: $$autologonUnzipDestination")
    
    OutputWriter("Archive will be extracted to: $autologonUnzipDestination")
    OutputWriter("Target executable should be in: $autologonExePath")
    
    ##################################################
    # Prepare for download and extraction
    ##################################################
    if (-not (Test-Path $autologonDownloadDestination)) {
        OutputWriter("Creating folder to store Autologon download")
        New-Item -Path $autologonDownloadDestination -ItemType Directory -Force | Out-Null
    }
    else { 
        # OutputWriter("Folder already exists.")
        LogWriter("Autologon download folder already exists.")
    }
    
    ##################################################
    # Download AutoLogon and Extract
    ##################################################
    OutputWriter("Downloading SysInternals' AutoLogon")
    if (-not (Test-Path $autologonExePath)) {
        OutputWriter("AutoLogon64.exe not found. Proceeding to download and extract...")
        
        try {
            Invoke-WebRequest -Uri $autologonDownloadUrl -OutFile $autologonZipDestination -UseBasicParsing
            Expand-Archive -Path $autologonZipDestination -DestinationPath $autologonUnzipDestination -Force
            OutputWriter("Download and extraction complete.")
        }
        catch {
            OutputWriter("Failed to download or extract AutoLogon: $_")
            exit 1
        }
    } else {
        OutputWriter("AutoLogon already downloaded and extracted.")
    }
    
    
    ####################################################################################################
    # Create autologon user (if not exists)
    ####################################################################################################
    try {
        if (-not (Get-LocalUser -Name $autologonUsername -ErrorAction SilentlyContinue)) {
            OutputWriter("Creating local user '$autologonUsername'")
            New-LocalUser -Name $autologonUsername -Password $securePass -FullName $autologonUsername -PasswordNeverExpires:$true -UserMayNotChangePassword:$true
            OutputWriter("User '$autologonUsername' created.")
        } else {
            OutputWriter("User '$autologonUsername' already exists.")
        }
    }
    catch {
        OutputWriter("Failed to create or check user: $_")
        throw "Failed to create or check for user existence: $_"
    }
    
    ####################################################################################################
    # Configure AutoLogon using AutoLogon64.exe
    ####################################################################################################
    if (Test-Path $autologonExePath) {
        try {
            OutputWriter "Running AutoLogon64.exe configuration..."
            Start-Process $autologonExePath -ArgumentList $autologonUsername,$env:COMPUTERNAME,$password,"-accepteula" -Wait
            OutputWriter("AutoLogon configured.")
        }
        catch {
            OutputWriter("Failed to configure AutoLogon: $_")
            exit 1
        }
    } else {
        OutputWriter("AutoLogon64.exe not found at expected path: $autologonExePath")
        exit 1
    }
    
    ####################################################################################################
    # Registry configuration
    ####################################################################################################
    OutputWriter("Configuring registry values for AutoLogon...")
    
    $winlogonPath = "HKLM:\SOFTWARE\Microsoft\Windows NT\CurrentVersion\Winlogon"
    $policyPath   = "HKLM:\SOFTWARE\Microsoft\Windows\CurrentVersion\Policies\System"
    
    # Ensure required policies
    try {
        $regSettings = @{
            "$policyPath\dontdisplaylastusername"           = 0
            "$policyPath\DisableAutomaticRestartSignOn"     = 0
            "$winlogonPath\AutoLogonCount"                  = $autoLogonCount
        }
    
        foreach ($key in $regSettings.Keys) {
            $pathParts = $key.Split('\')
            $regPath = ($pathParts[0..($pathParts.Length - 2)] -join '\')
            $regName = $pathParts[-1]
            $desiredValue = $regSettings[$key]
    
            $existing = Get-ItemProperty -Path $regPath -Name $regName -ErrorAction SilentlyContinue
            if ($existing.$regName -ne $desiredValue) {
                Set-ItemProperty -Path $regPath -Name $regName -Value $desiredValue
                OutputWriter("Set registry '$regName' to '$desiredValue'")
            } else {
                OutputWriter("Registry '$regName' already set to '$desiredValue'")
            }
        }
    }
    catch {
        OutputWriter("Failed to update registry keys: $_")
        exit 1
    }
    OutputWriter("AutoLogon setup complete")


    Don’t say I didn’t warn you…

    Using AutoLogon as above means that the user’s password is stored in the Windows registry. If an attacker gains access to the system and can read the registry, they could retrieve this password and gain unauthorized access to the account. There is a trade-off between convenience and security when using AutoLogon.

    However, all of that said, there is no traditional console access to Azure VMs, and retrieving this password would require admin-level access to the Windows OS. If someone has this access, the system is already compromised, and the local user account is the least of your worries.

    Look out!

    This was the first installment of this series. In part two I will walkthrough how similar approach can be used to prepare a Session Host for testing in a fully automated, hands-off manner. See you there.

  • Login Enterprise: n8n Integrations

    Welcome to my website, and my first post. Here I’ll write some blogs, and share some projects from Campa Labs.

    n8n

    This one’s about first experiences with n8n, a workflow automation platform. It highlights three MVP workflows with three integrations:

    • Login Enterprise Continuous Test Diagnostics
    • Login Enterprise Load Test Data Analyst
    • Scheduled-Login Enterprise Continuous Test Diagnostics

    Login Enterprise Continuous Test Diagnostics Agent

    Tools can be intelligently used by AI Agent’s based on their description e.g. “Use this Tool when…” It’s actually pretty cool to see this happen with different inputs. The idea behind this example was for a higher level IT executive to have quick, accessible information on a Continuous Test. E.g. a test is used to monitor availability of critical remote desktop systems and teams could get diagnostics on uptime and perf.

    Login Enterprise Load Test Data Analyst

    For fun, an integration with Microsoft Teams was added to this Agent, which uses a Webhook to send similar reports into a Teams channel. Think: “How did our last test for Windows 11 look on those new Azure VMs?” The Agent is smart enough to get the dataset from the test’s latest execution, summarize it, and then send it to Teams.

    Here’s a snippet from an example report into a Teams channel.

    Scheduled-Login Enterprise Continuous Test Diagnostics

    And here’s an example of a scheduled workflow. Every N hours this workflow sends a status report into a Teams channel for all actively running Continuous Tests. Similar to the first example, except fully-automated. (Thanks for noticing the sticky notes.)

    Learnings

    One learning was the importance of prompt engineering. This was evident from regular usage of ChatGPT, but even more so here when working with mainly numeric data. On the same lines, iterative testing showed it was also important to limit the data sent to the Chat Model; two reasons being token restrictions and the confusion. The Model was emphasizing irrelevant data returned from the API which called for cleaning.

    Not sure what’ll be covered next, but see you there. Hope you enjoyed.